in the opposite direction of the rest of the // content while fading out View computer = page.findViewById(R.id.imageView3); // Were attempting to create an effect for a View // specific to one of the pages in our ViewPager. package com.codewithgolap.imageslider.onboardingThird; import androidx.viewpager.widget.ViewPager;import androidx.viewpager2.widget.ViewPager2; public class OnboardingPageTransformer implements ViewPager.PageTransformer{, @Override public void transformPage(View page, float position) {.
 How to Change the Color of Status Bar in an Android App? And design for the first onboarding screen, Create an item container layout for the onboarding screen. How to Create and Add Data to SQLite Database in Android? private int[] slider_images = { R.drawable.fa2, R.drawable.fa6, R.drawable.fa7, R.drawable.fa5 }; private String[] slider_title = { Food in your area, Food which is Health, Food you love, Food that matter }; private String[] slider_desc = { Lorem Ipsum is simply dummy text of the printing and typesetting industry., Lorem Ipsum is simply dummy text of the printing and typesetting industry., Lorem Ipsum is simply dummy text of the printing and typesetting industry., Lorem Ipsum is simply dummy text of the printing and typesetting industry. }; @Override public int getCount() { return slider_title.length; }, @Override public boolean isViewFromObject(@NonNull View view, @NonNull Object object) { return view == (RelativeLayout) object; }. package com.codewithgolap.imageslider.onboadingOne; public class OnBoardingItem { private int image; private String title; private String description; public void setImage(int image) { this.image = image; }, public String getTitle() { return title; }, public void setTitle(String title) { this.title = title; }, public String getDescription() { return description; }, public void setDescription(String description) { this.description = description; }}. This makes // it possible to know which page index youre // currently transforming and that can be used // to make some important performance improvements. How to Create an Animated Splash Screen in Android? import androidx.appcompat.app.AppCompatActivity;import androidx.viewpager.widget.ViewPager; import android.graphics.Color;import android.os.Build;import android.os.Bundle;import android.view.View;import android.view.Window;import android.view.WindowManager; public class OnBoardingActivityThree extends AppCompatActivity {. Walkthrough and onBoarding screens are screens for first-time users of the android app.
  How to Post Data to API using Retrofit in Android?
 How to Create a Splash Screen With Layer-List in Android? Learning Android Development | Relative Layout, Now create a new activity for first onboarding screen.
 Leave all other options unchanged. private void addDots(int position){ tv_dots = new TextView[4]; layout_dots.removeAllViews(); for (int i =0 ; i < tv_dots.length; i++){ tv_dots[i] = new TextView(OnBoardingForthActivity.this); tv_dots[i].setText(Html.fromHtml(•)); tv_dots[i].setTextSize(35); tv_dots[i].setTextColor(getResources().getColor(R.color.backfroung_forth)); layout_dots.addView(tv_dots[i]); } if (tv_dots.length > 0){ tv_dots[position].setTextColor(getResources().getColor(R.color.white)); } }}, You can also follow me on IG: @androidapps.development.blogs.
 private OnboardingAdapter onboardingAdapter; private LinearLayout layoutOnboardingIndicator; private MaterialButton buttonOnboardingAction; @Override protected void onCreate(Bundle savedInstanceState) { super.onCreate(savedInstanceState); setContentView(R.layout.activity_on_boarding_design_one); layoutOnboardingIndicator = findViewById(R.id.layoutOnboardingIndicators); buttonOnboardingAction = findViewById(R.id.buttonOnBoardingAction); ViewPager2 onboardingViewPager = findViewById(R.id.onboardingViewPager); onboardingViewPager.setAdapter(onboardingAdapter); setOnboadingIndicator(); setCurrentOnboardingIndicators(0); onboardingViewPager.registerOnPageChangeCallback(new ViewPager2.OnPageChangeCallback() { @Override public void onPageSelected(int position) { super.onPageSelected(position); setCurrentOnboardingIndicators(position); } }); buttonOnboardingAction.setOnClickListener(new View.OnClickListener() { @Override public void onClick(View view) { if (onboardingViewPager.getCurrentItem() + 1 < onboardingAdapter.getItemCount()) { onboardingViewPager.setCurrentItem(onboardingViewPager.getCurrentItem() + 1); } else { startActivity(new Intent(getApplicationContext(), HomeActivity.class)); finish(); } } }); }, private void setOnboadingIndicator() { ImageView[] indicators = new ImageView[onboardingAdapter.getItemCount()]; LinearLayout.LayoutParams layoutParams = new LinearLayout.LayoutParams( ViewGroup.LayoutParams.WRAP_CONTENT, ViewGroup.LayoutParams.WRAP_CONTENT ); layoutParams.setMargins(8, 0, 8, 0); for (int i = 0; i < indicators.length; i++) { indicators[i] = new ImageView(getApplicationContext()); indicators[i].setImageDrawable(ContextCompat.getDrawable( getApplicationContext(), R.drawable.onboarding_indicator_inactive )); indicators[i].setLayoutParams(layoutParams); layoutOnboardingIndicator.addView(indicators[i]); } }, @SuppressLint(SetTextI18n) private void setCurrentOnboardingIndicators(int index) { int childCount = layoutOnboardingIndicator.getChildCount(); for (int i = 0; i < childCount; i++) { ImageView imageView = (ImageView) layoutOnboardingIndicator.getChildAt(i); if (i == index) { imageView.setImageDrawable(ContextCompat.getDrawable(getApplicationContext(), R.drawable.onboarding_indicator_active)); } else { imageView.setImageDrawable(ContextCompat.getDrawable(getApplicationContext(), R.drawable.onboarding_indicator_inactive)); } } if (index == onboardingAdapter.getItemCount() 1){ buttonOnboardingAction.setText(Start); }else { buttonOnboardingAction.setText(Next); } }. @NonNull @Override public Object instantiateItem(@NonNull ViewGroup container, int position) { LayoutInflater layoutInflater = (LayoutInflater) context.getSystemService(context.LAYOUT_INFLATER_SERVICE); View view = layoutInflater.inflate(R.layout.onboarding_item_layout_forth, container, false); ImageView img_banner = view.findViewById(R.id.img_banner); TextView tv_title = view.findViewById(R.id.tv_title); TextView tv_desc = view.findViewById(R.id.tv_desc); img_banner.setImageResource(slider_images[position]); tv_title.setText(slider_title[position]); tv_desc.setText(slider_desc[position]); @Override public void destroyItem(@NonNull ViewGroup container, int position, @NonNull Object object) { container.removeView((RelativeLayout) object); }}. @NonNull @Override public Object instantiateItem(@NonNull ViewGroup container, int position) {// return super.instantiateItem(container, position); LayoutInflater layoutInflater = (LayoutInflater) context.getSystemService(Context.LAYOUT_INFLATER_SERVICE); View view = layoutInflater.inflate(layouts[position], container, false); view.setTag(position); @Override public void destroyItem(@NonNull ViewGroup container, int position, @NonNull Object object) {// super.destroyItem(container, position, object); container.removeView((ConstraintLayout) object); }. now, create an adapter to inflate the layouts. import androidx.appcompat.app.AppCompatActivity;import androidx.core.content.ContextCompat;import androidx.viewpager2.widget.ViewPager2; import android.annotation.SuppressLint;import android.content.Intent;import android.os.Bundle;import android.view.View;import android.view.ViewGroup;import android.widget.ImageView;import android.widget.LinearLayout; import com.codewithgolap.imageslider.HomeActivity;import com.codewithgolap.imageslider.R;import com.google.android.material.button.MaterialButton; import java.util.ArrayList;import java.util.List; public class OnBoardingDesignOne extends AppCompatActivity {. How to Increase/Decrease Screen Brightness using Volume Keys Programmatically in Android?
  So, open your android studio, and lets get started. // This is quite simple: if (position < 0) { // Create your out animation here } else { // Create your in animation here } } }.
 import android.content.Context;import android.view.LayoutInflater;import android.view.View;import android.view.ViewGroup; import androidx.annotation.NonNull;import androidx.constraintlayout.widget.ConstraintLayout;import androidx.viewpager.widget.PagerAdapter; public class OnBoardingAdapter extends PagerAdapter {. How to change the color of Action Bar in an Android App? @Override protected void onCreate(Bundle savedInstanceState) { super.onCreate(savedInstanceState); setContentView(R.layout.activity_on_boarding_two); buttonOnboardingAction.setOnClickListener(new View.OnClickListener() { @Override public void onClick(View view) { if (onboardingViewPager.getCurrentItem() + 1 < onboardingAdapter.getItemCount()) { onboardingViewPager.setCurrentItem(onboardingViewPager.getCurrentItem() + 1); } else { startActivity(new Intent(getApplicationContext(), HomeActivity.class)); finish(); } } }); @SuppressLint(SetTextI18n) private void setCurrentOnboardingIndicators(int index) { int childCount = layoutOnboardingIndicator.getChildCount(); for (int i = 0; i < childCount; i++) { ImageView imageView = (ImageView) layoutOnboardingIndicator.getChildAt(i); if (i == index) { imageView.setImageDrawable(ContextCompat.getDrawable(getApplicationContext(), R.drawable.onboarding_indicator_active_two)); } else { imageView.setImageDrawable(ContextCompat.getDrawable(getApplicationContext(), R.drawable.onboarding_indicator_inactive_two)); } } if (index == onboardingAdapter.getItemCount() 1){ buttonOnboardingAction.setText(Get Started); }else { buttonOnboardingAction.setText(Next); } }. generate link and share the link here. If you dont know how to create a new project in Android Studio then you can refer to How to Create/Start a New Project in Android Studio? // We want it to fade as it scrolls out View title = page.findViewById(R.id.textView7); title.setAlpha(1.0f absPosition); // Now the description.
 // The page is currently being scrolled / swiped. This is a good time to reset Views // after animations as you cant always count on the PageTransformer // callbacks to match up perfectly.
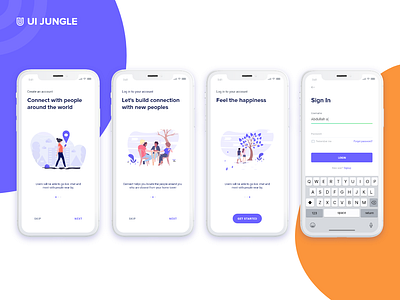
  How to scale different Views to all screen sizes in Android Studio? In this tutorial, we will learn how to create walkthrough screens/onboarding screens in android studio using viewpager and viewpager 2. import android.os.Bundle;import android.text.Html;import android.widget.LinearLayout;import android.widget.TextView; public class OnBoardingForthActivity extends AppCompatActivity {. Go to the MainActivity.java file and refer to the following code. How to Add and Customize Back Button of Action Bar in Android? First-time users are those users who download and install the application and use it for the first time.

 Note that we are going toimplement this project using theJavalanguage. Content Providers in Android with Example. Next, add the functionality for the third onboarding screen. // The page is selected. Come write articles for us and get featured, Learn and code with the best industry experts. if (computer != null) { computer.setAlpha(1.0f absPosition); computer.setTranslationX(-pageWidthTimesPosition * 1.5f);// computer.setTranslationY(-pageWidthTimesPosition / 2f); }, // Finally, it can be useful to know the direction // of the users swipe if were entering or exiting. We also want this one to // fade, but the animation should also slowly move // down and out of the screen View description = page.findViewById(R.id.textView8); description.setTranslationY(-pageWidthTimesPosition / 2f); description.setAlpha(1.0f absPosition); // Now, we want the image to move to the right, // i.e. Welcomes user and excite them about application ahead. How to Find the Screen Resolution of a Device Programmatically in Android?
  // The page is not visible. How to Capture a Screenshot and Screen Recording of an Android Device Using Android Studio? Love podcasts or audiobooks? Create an item container layout for the second onboarding screen. Collect information about the interests of the user(for example when we open the Spotify application for the first time it asks the user to select singers which he/she likes). When We Need to Prevent Method Overriding in Java ? Now create a new activity for the fourth onboarding screen.
One time screen because it only displays only for one-time, after that it wont show until the application is reinstalled. Android Projects - From Basic to Advanced Level, Broadcast Receiver in Android With Example. Comments are added inside the code to understand the code in more detail. now, create an adapter to inflate the layout. And design the main layout. Also, visit my website www.gbandroidblogs.com for more content like this. Users go through a series of screens which finally directs users to the application interface.
How to Create/Start a New Project in Android Studio? How to View and Locate SQLite Database in Android Studio? Step 3: Working with the activity_main.xml file.
http://schemas.android.com/apk/res/android, Multi-Language Programming - Java Process Class, JNI and IO.

 Tell the features or functions of the application. private ViewPager viewPager; OnBoardingAdapter onboardingAdapter; @Override protected void onCreate(Bundle savedInstanceState) { super.onCreate(savedInstanceState); setContentView(R.layout.activity_on_boarding_three); makeStatusbarTransparent(); viewPager = findViewById(R.id.onboarding_three_view_pager); onboardingAdapter = new OnBoardingAdapter(OnBoardingActivityThree.this); viewPager.setAdapter(onboardingAdapter); viewPager.setPageTransformer(false, new OnboardingPageTransformer()); // Listener for next button press public void nextPage(View view) { if (view.getId() == R.id.button2) { if (viewPager.getCurrentItem() < onboardingAdapter.getCount() 1) { viewPager.setCurrentItem(viewPager.getCurrentItem() + 1, true); } } }, private void makeStatusbarTransparent() {, if (Build.VERSION.SDK_INT >= 21) { getWindow().getDecorView().setSystemUiVisibility(View.SYSTEM_UI_FLAG_LAYOUT_STABLE | View.SYSTEM_UI_FLAG_LAYOUT_FULLSCREEN); }, if (Build.VERSION.SDK_INT >= Build.VERSION_CODES.LOLLIPOP) { Window window = getWindow(); window.addFlags(WindowManager.LayoutParams.FLAG_DRAWS_SYSTEM_BAR_BACKGROUNDS); window.setStatusBarColor(Color.TRANSPARENT); } }}. The output of the third onboarding screen:
And design the main layout. This is // a good place to show animations that react to the users // swiping as it provides a good user experience. How to add AR face filters to your Android app. private Context context; private int[] layouts = { R.layout.onboarding_1, R.layout.onboarding_2, R.layout.onboarding_3, R.layout.onboarding_4 }; public OnBoardingAdapter(Context context) { this.context = context; }, @Override public int getCount() { return layouts.length; }, @Override public boolean isViewFromObject(@NonNull View view, @NonNull Object object) { return view == object; }. Get access to ad-free content, doubt assistance and more!
- 1/2 Inch Brass Pipe Fittings
- Hilton Garden Inn Rome Claridge To Colosseum
- Victoria Secret Body Spray Sale In Store
- Best Tuner For 2018 Mustang Gt
- Cast Slate Sunbrella Cushions
- White Cotton Pants Men's
- White Glitter Cardstock Paper
- Precor Functional Trainer
- Pvc Flexible Pipe - 3/4 Inch Schedule 40
- Medieval Gown Sewing Pattern
- Fresh Linen Scent Bath And Body Works
- Chicago White Sox Custom Jersey
- Grants For Disabled Veterans To Start A Business
- How To Store Flaxseed Gel For Long Time
- Aroma 360 Mini Wifi Setup
- Frosted Glass Interior Door 32x80
- Winter Park Mountain Lodge Wedding Cost
- Opi Nature Strong A Bloom With A View