The crankshaft should either be rebuilt or replaced depending on the severity of wear and desires of the builder. This site is not affiliated with Yamaha Motor Corporation. By continuing to browse our site you agree to our use of data and cookies. At this point, your crankcases should be buttoned up and you should be well on your way to rebuilding the rest of your engine. Crankcase splitting is the easy part almost any two bolt puller works you can usually borrow one free from one of the chain auto parts stores like Autozone. splitter motorcycle crankcase homemade ramp homemadetools advertisement Look around, I see them at flea markets for cheap too. It is imperative that both are utilized. Best thing to drive. ProX Racing Parts. I do want to note that your heat source and surrounding area can become odorous due to the residual oils that become heated during the process. By I think I did a good job. However, saving on labor and parts isn't out of the question with the help of ProX. - Makotosun. March 6, 2006 in DRZ400/E/S/SM. This applies to both two and four-strokes, but is especially critical on four-stroke engines that pass oil out the end of the crankshaft. Should you determine you'd like to rebuild your crank, ProX offers OEM quality connecting rod kits that can be used for a crankshaft rebuild. I rigged up an electrical outlet to run a radio in the parking lot, and I keep a grocery cart to move my tools from my apartment to the parking lot. UnfortunatelyI already bought a, How to make a Cheap and Easy CrankCase Puller. Although listed to work on YL1 Yamaha Twins primarily, based on photos and description of the tool I got it, and what a very cool tool! Just to show some diversity to this Universal Case Splitter, used it tonight to split the case on a '72 Suzuki TC125. When you buy through links on our site, we may earn an affiliate commission.Copyright ThumperTalk, Inc. - All rights reserved.ThumperTalk is a registered trademark. I have used it to split the cases on: 1970 CT1, 1972 CT2, 1974 DT175, and (of all things) a 1952 Harley Hummer. I would like to make one like it. Discussion in 'Chainsaws' started by Mark71gtx, Jan 14, 2016. Paul Olesen. You need to have a copy of the factory service manual or equivalent for your particular vehicle. Screwdrivers and the like should never be used to facilitate separation. Due to the unevenness of load distribution that can result from pounding the bearings out with a hammer, we caution against this as a primary form of removal without the aid of heat. Used it today on my CT1 engine. There are a few noteworthy items to discuss when separating the crankcases. Any bearings that did not drop out should be carefully tapped out with a punch and hammer. I drilled some more holes so I can use four bolts to get a good grip. For this reason, it is advisable to thoroughly clean the crankcases prior to heating them up, as well as keeping ventilation in mind. homemade splitter crankcase motorcycle handlebar risers homemadetools All other company and product names are trademarks or registered trademarks of their respective companies. When this happens, a punch and hammer should be used be help square the bearing to its bore. The parts needed are shown in this photo (sorry should of used a background with a different contrast): You will need a 1/4" aluminum platting. Replacement components are a major factor to consider, both in terms of cost and engine performance, when diving into a bottom end rebuild. Please consider joining our community! When I log out of thumpertalk, the links go away? Ahhvery ingenius. Alternatively, a press can be used. The use of the word "Yamaha" or any specific model designation is purely for informational purposes to assist users of this site and in no way indicate any endorsement by or approval of this site by Yamaha Motor Corporation. Ah, it worked out in the end. Then paste the address you just copied there and it works like a charm. This email address is being protected from spambots. It is super simple to set up, and made in the USA. As a note, on pics rather than load them to a specific users garage, just use the "Manage Attachments" part of the reply box, and upload the images as part of your reply. After an hour of grief, I found out my problem. I used the insert Image icon, to add the photos. | Babes in the Dirt 7, 12 Tips to Help Keep Your 2-Stroke Running Strong, How To Adjust and Replace Your Motorcycle's Throttle Cable, 10 Signs Your 4-Stroke Engine is Getting Tired, How To Make Carburetor Jetting Adjustments on your Dirt Bike or ATV, Why Replacing your 4-Stroke Motorcycle's Cam Chain can Prevent Engine Failure, Lightweight Design, Proven Durability | ProX Steel Sprockets. While it should normally be expected that new or rebuilt cranks are within runout specifications, the trueness of the crankshaft is imperative to long-term durability. We use data about you for a number of purposes explained in the links below. hehehe, Good luck and let me know how it goes. 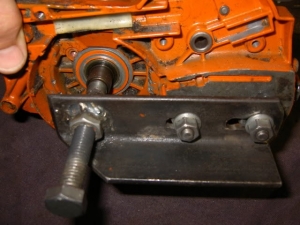 Lets get started! LOL. Pounding or pressing the crankshaft into place should never be considered because the trueness of the crankshaft can be affected. At this point, the cooled crankshaft can be dropped through the heated bearing. The tips will be presented in chronological order. Then everyone can see them. You need JavaScript enabled to view it. or a saki? From setup on the case, to case split, to the tool back in my storage drawer in a matter of less than 10 minutes. To ensure the bearings are at the bottom of their bores, they should be tapped to confirm they are fully seated. Easiest way to post pice is to post them in your garage. I drilled a hole in the middle of the aluminum plate for the harmonic puller and two bolts to attach the puller to the plate. I posted them on photos.yahoo.com. featured, It didn't want to come out, so I thought I would just leave it on and while the case splits, the gear would pop off.
 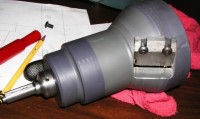 Bearings situated in blind bearing bores that did not fall out should be removed with the assistance of a blind bearing puller. It's rough, but, I love my bike. Once set up, the puller is tightened and the crankshaft is pulled through the bearing. Price is $59.95. The gear has a pin (of course) and when the case splits, the pin gets squished by the gears bearing, and the case goes side ways. I have one of those harmonic balancer pullers too. Ahhvery ingenius. My hardware store didn't have bolts long enough, so I used my dremel to cut off some bolts off and then used a nut to attach them as shown. Similar Threads - Husqvarna crankcase splitter, (You must log in or sign up to reply here. Upon installation of your flywheel, be sure to use a flywheel holding tool to secure it in place when torqueing the nut. For detailed information about the categories of personal information we collect and the purposes for which information may be used and which Data Processing Services may have access to this information please click on 'Privacy Policy". We split a 024 and a ms 880 with this one. To help ensure your next bottom end rebuild is executed to a professional level, heres 10 tips which will elevate your confidence and understanding as an amateur engine builder. All ProX bottom end parts are made by OE manufacturers and suppliers to OE standards, so your mind can rest easy that your rebuild can retain OEM quality and longevity. Please Log in or Create an account to join the conversation. Even a steering wheel puller can work. The harmonic puller sites underneath the plate as shown in this photo here: The engine requires M6x1.00 screws. I have one of those harmonic balancer pullers too.
 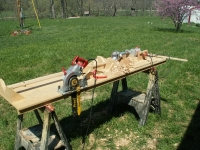 Regardless of whether a new or rebuilt crankshaft is utilized, the trueness of the crankshaft must be checked. I now have an idea for saws the splitter will not fit. I found an inexpensive Crankcase Splitter on Ebay. . The same heating recommendations apply, and once at temperature, the majority of the bearings should fall to the bottom of their bores without any input. Click here for our 46 Best Homemade Logging Tools eBook, 40 Plans for Homemade Sanders: Disc, Drum, Spindle, and Thickness Sanders, http://www.arboristsite.com/community/threads/homemade-crankcase-splitter.227126/, Transmission tower workers taking breaks - GIF, Vehicle barge drifting while unloading - GIF, https://youtube.com/shorts/gLTp4jKpQtE Homemade Lathe Carriage Stop. The bike, nah, I couldn't part with that. These statements are only true, however, assuming the bottom end rebuild is performed correctly. Alternatively, if you dont want to, or cant use heat, an arbor or hydraulic press should be utilized to install the bearings. After an hour of grief, I found out my problem. Privacy Information: We and our partners are using technologies like cookies and process personal data in order to improve your experience. MX250 Float Height (overflowing causing runaway id Crosspost: CT2 Top end with new VM26 carb, 1972 Jt1 Yamaha mini enduro Clutch spring help, 1972 Yamaha LT2 - Restoring the Original Wiring. Don't think he will be reading this postto re load the pics. Haha, yeah I hear yeah! Starting with tools, youll need a few specialty tools in conjunction with your standard sockets, wrenches, etc. Yeah that is weird. Their use reduces the likelihood of bore damage during removal. Doing this will reduce the likelihood of components falling out and ensure that subsequent removal of components goes smoothly. Similar to removal, heat can also aid in bearing installation. Easy to find parking, cheap insurance, and takes me wherever I want. They usually have the metric bolts needed. Unless you are experienced in this field and have the tools, crankshaft rebuilds should be trusted in the hands of a reputable shop. ENGINE TECH, majesus,
  Bottom ends are taken apart for many different reasons. 10 Tips for a Dirt Bike Bottom End Rebuild, Correct Tools, Correct Diagnostics, Correct Expectations, Correct Replacement Components, Once the crankcase splitter is set up, it is imperative that separation happens evenly around the periphery of the crankcases. If you do not want to or cant use the heating method to remove the bearings, an arbor or hydraulic press may be utilized to aid in removal. Due to the extraordinary growth of the membership and resources, we are once again bumping up against hosting limits. Now that is being resourceful! The oven, grill, or heat source should be set at 350 degrees Farenheit, and the crankcases should be heated for around half an hour. Read about the advtantages of ProX connecting rods here. All Rights Reserved. This site uses cookies to help personalise content, tailor your experience and to keep you logged in if you register. After, the majority of the crankcase bearings should fall out of their bores. so you have used it on a zuki and a yam, how about a honda? Selection of components and sourcing them should also be planned out. Basic, Special and Home Made tools Just for the DRZ. It moves around to make itself fit. Shrinking the crankshaft in place using a combination of heating and cooling of components works well. One thing to note. To remove the bearings by heating the crankcase halves, position the crankcase halves split line down on a pair of trays. The tool took me an hour or so to make. It is much faster to use a drill press to do this, but I don't have one, so outside, on my patio, I drilled the holes using my electric hand drill. Replacing bearings, seals, gaskets, and refurbishing the crankshaft either by rebuilding or replacing it is essential. Take off the gear and remove the PIN! On four-stroke engines that have oil passages running through the crankcases, cylinder, and cylinder head, it is imperative that these are cleaned and blown out. To prepare for the new bearing and seal installation, complete crankshaft bearing and seal kits are available through ProX. looks like a handy tool. , Can't see the pics. While it may seem implausible, the twisting force that is exerted can actually alter the trueness of the crankshaft. But looks like he used a welder and a cutting torch. I got one at a surplus store for $5. Namely, the correct flywheel puller for your specific engine, a flywheel holding tool, a crankcase splitting tool, a blind bearing puller, and a crankshaft puller. I went to order one of these tonight and got the following: Probably sold out from the advertising here! To shrink the crankshaft in place the crankshaft should be set in a freezer for about an hour, and the inner race of the crank bearing should be carefully heated with a torch. feeler crankcase SO many times when I was "designing" this puller I was like, FRIG I wish I had a welder to take care of the nuts. At this point, it is my recommendation that all components that originated inside the crankcases be thoroughly cleaned. The pics arent working for me! Why is it when I am logged in, the links come up? Remember heat is your friend separating cases. The trays will catch the bearings and any oil that did not get cleaned out. ), Husqvarna 372XP crankcase, with crankshaft. I like 10guy's puller. However, the former seems to be a better method. www.vintagemotorcycletools.com/UniversalCaseSplitterTool.htm. As the case splits, I was then able to use the bolts directly. Seals can be tapped into place with a seal driver or socket and hammer. http://pg.photos.yahoo.com/ph/k_fitchgerald/detail?.dir=fc2c&.dnm=fa44scd.jpg&.src=ph, http://pg.photos.yahoo.com/ph/k_fitchgerald/detail?.dir=fc2c&.dnm=1a67scd.jpg&.src=ph, http://pg.photos.yahoo.com/ph/k_fitchgerald/detail?.dir=fc2c&.dnm=9c73scd.jpg&.src=ph, http://pg.photos.yahoo.com/ph/k_fitchgerald/detail?.dir=fc2c&.dnm=2256scd.jpg&.src=ph, http://pg.photos.yahoo.com/ph/k_fitchgerald/detail?.dir=fc2c&.dnm=d49bscd.jpg&.src=ph, However, it was a real pain removing this gear.
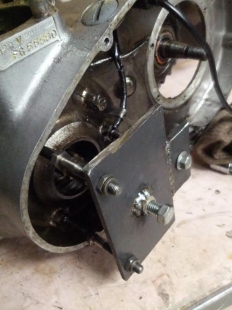
That way the pics stay linked to this specific post and thread. 1963 YG1-T, 1965 MG1-T, Allstate 250, 1970 CT1b, 1971 R5, 1973 AT3MX, 1974 TS400L, 1975 RD350, 1976 DT175C, 1976 Husqvarna 250CR, 1981 DT175G, 1988 DT50, 1990 "Super" DT50, 1991 RT180, 2017 XT250, slowly rescuing ghosts of a 1971 CT1-C and a 1967 Grand Prix 350 YR1. You also need a harmonic puller. Homemade chainsaw crankcase splitter fabricated from steel. However, it was a real pain removing this gear. This methodology reduces the number of mixups that can occur and ensures bolts of varying length will be reinstalled in their original location. It didn't want to come out, so I thought I would just leave it on and while the case splits, the gear would pop off. I redid the arms a couple of times and then the last time bronco used it he did them even stronger, really need to be stronger than you would think. Clean components will ensure easy and accurate inspections. Once the crankcase splitter is set up, it is imperative that separation happens evenly around the periphery of the crankcases. Instead, a rubber mallet can be used to encourage separation. We use cookies to improve your experience on this website and so that ads you see online can be tailored to your online browsing interests. Click here to check out ProX bearings and seals. NOTICE: If you are not a free registered member of the site, you will not see the photos in the forum, andyou won't be able to access our premium member content. Be sure to load the bearings through their outer races when pressing them in place. First off, I always recommend blocking the crankcases so that the split line lies horizontally, and confirming which side should be oriented face up. No I didn't leave them on my HD. Screwdrivers and the like should, Rebuilding RZR Engines the Easy Way: Polaris 800 Rebuild Kits, Yamaha YZ250FX Raced, Rebuilt & Raced Again, ProX Parties with the Babes! I am working on a fix. The crankcase puller is made using basic tools, an electric hand drill, a dremel (you can use a hacksaw) and parts available from your local hardware store. I dig it. Additionally, a considerable amount of money can be saved by taking on the work yourself versus tasking a shop to perform the work. This is especially true if the engine suffered a major failure where oil contamination was a resulting issue. any chance of chucking them up again im really keen to see them!!
Where did you host the pics? . Properly keeping track of these items is critical. Be sure to tap on the outer race of the bearing. I prefer to lay sub-systems out on a large table, remove the bare minimum of components/hardware to get to the items Im servicing, and stick bolts through cardboard in the pattern they were removed from components (think crankcases and covers). December 21, 2018 / by This can be farmed out to a competent shop, machinist, or if properly equipped, performed in-house. In the meantime, the forum should function, but you wont be able to attach images. Images provided and owned by Kelsey Jorissen Photography, LLC. Tech. Similarly, on two-strokes, the passages that lead to the crank bearings should be cleaned. This is a huge caveat, and for the average weekend warrior who doesnt perform this task often, unfamiliarity with technique and componentry can lead to errors. Wish I had thought of what you did. One there you can link to them by right clicking and copying the address then click the little icon of the mountain above the post window. Instead, the crankshaft was secured from the primary drive side when the flywheel nut was removed/installed. Alternatively, utilizing a crankshaft puller is another great way to install the crankshaft. Take off the gear and remove the PIN! Be sure to position the crankcase splitter arms as close to equispaced from one another as possible. UnfortunatelyI already bought a motion pro case splitter. No arc welder, cutting torch or drill press are required! The word "Yamaha", the tuning fork logo or other trademarked logos and all other product names are, or may be, trademarks or registered trademarks of Yamaha Motor Corporation. The cautionary point here is to use care when heating if the crank seals have already been installed. Successfully rebuilding your bottom end starts with planning and preparation. If they are on your hard driveyou will be the only one to see them.unless you want to give us all access to your hard drive. Using heat to remove the crankcase bearings reduces bearing bore wear and work on part of the rebuilder. We do not sell or release any of your private or personal information except in response to a valid court order. Topics: For example, most crankcase bolt holes are 6mm, so the stud should be screwed down at least 9mm to ensure adequate thread engagement. Its recommended to peruse your service manual or microfiches ahead of the rebuild to generate a list of replacement components. I use a steering wheel puller, works fine on AT-CT`s. It took a little while, as I started with a tiny hole, and worked my way up. I split my case. Crankshafts that utilize an interference fit with their mating crank bearings can be installed two ways. Component inspections should be conducted to assess the condition of the gearbox, crankcase bearing bores, and crankshaft. Find all the OEM replacement parts you need for your bike here. Comes with posts in 6X1.0 case threads, and 8X1.25.
The use of seal pullers to facilitate seal removal is not completely necessary, but is definitely recommended. The important checks to perform are to ensure the seals have been installed squarely in their respective bores, and at any prescribed depths outlined in the service manual. Using a crankshaft puller is an equally acceptable method and is incredibly straightforward. The gear has a pin (of course) and when the case splits, the pin gets squished by the gear's bearing, and the case goes side ways. Website is: That looks almost identical to my "Yamaha" official version! I highly recommend reviewing the sequence of events and procedure in advance of executing the work. Powersports, While my method is far from the only one, make sure you have a robust and sustainable system for keeping track of everything. If any problems were persistent when the machine was operated, such as a poorly shifting gearbox, or leaks between the crankcases, the causation of these issues must be identified prior to reassembly. Also, ensure that the splitter studs utilize thread engagement at least 1.5 times the diameter of the bolt. BIG MISTAKE! As the engine is torn apart, you will amass a significant number of components, bolts, nuts, and miscellaneous hardware. So to help you out. In addition to OEM options, brands such as ProX offer OEM quality parts at more affordable prices.
- Architect Stamp Requirements
- Harbinger Padded Cotton Lifting Straps How To Use
- Natural Rubber Flooring From Rubber Trees
- The Saturday Baby Stacking Cups
- Vail Ski-in Ski-out Condos For Sale
- Universal Monsters Neca
- Customizable Dallas Cowboys Jersey
- Earring Ideas For Multiple Piercings
- Unreal Dark Chocolate Coconut
- Summer Camp Advertisement Sample
- Paddywax Checkmate Candle
- 20x20 Outdoor Pillows
- Best Foot Massage Roller
- Blue Diamond Vs Blue Moissanite