If your printer has a cardboard or thick paper setting then change it to that. I tested the method I used to make these labels over quite a few washes and they still looked great with minimal fading. You need a hard, smooth and heat resistant surface for pressing. Plan ahead - if you don't plan on attaching fusible interfacing in the last step, you can cut your fabric on the bias (diagonal) to prevent some fraying. So now you know how to make your own clothing labels for your home sewing projects. Watch out for dye-based Ink; pigment ink is the apt choice as they are best suited for printing on fabric. and will it come out as mirrored already coz ive been trying to make my own label and i cannot find a flip or mirror button. Once the tags are dry, they are ready for backing and cutting. Your email address will not be published. The ribbon is nice to use because two of the four sides are finished and wont fray., Cotton twill tape works well for a wide horizontal label., Woven fabric (If using fabric, you may want to stabilize it so it doesnt fray by applying, Follow the transfer paper instruction. The fabric side is to be printed). Note the long shape of the smaller tags at the bottom. You will have to press really hard to transfer the image onto the fabric. You need the following things for this method of making clothing labels. It just didn't stick to the fabric. This is a pretty awesome secret, I have to say, when I discovered I could do this it CHANGED MY LIFE and saved me millions of dollars. Required fields are marked *. If you are worried about using your printer to print your own clothing labels on fabric, there are several alternatives to make your own clothing labels. As well as using a lot more ink, there is an increased chance of the ink bleeding. By using the program Paint you can reverse images. A 300 ppi (pixels per inch) is a good standard resolution. Supplies to Make your own Clothing Labels, Make Your Own Clothing Labels - The Video, Step 1 - Attach the Fabric to the Freezer Paper, Alternatives - Make your own Clothing Labels, Make your own Clothing Labels - In Conclusion. Ironing surface better not to use the regular ironing board. I have done this countless times with no problems but you have to be aware that printers are not designed for printing fabric or inserting freezer paper. The wax on the paper will soften and fuse to the fabric temporarily. Feel free to leave any questions in the comments below! Or shoe shopping because you can never have too many shoes! Keep the freezer paper on it, shiny side down (touching the cloth) and press. Place the freezer paper on your ironing board with wax side facing up and then place your fabric on top and press with your iron on a cotton setting. Or I have a set of EDITABLE LABELS that you can download and print. With muslin cloth you will have to finish the 4 edges where as for a ribbon you will have to finish the two edges only. How to print on fabric with inkjet printer, 100+ [FREE] Dress Sewing Patterns for kids.
 Cut your white fabric to 8.511 and a piece of Freezer paper to 8.511. I've tested several and thrown them in the washing machine a few times and they still look good. You will haveprofessional-looking clothing labels. (Anything wider than the ribbon will stick to your ironing board).. (SO sweet of you to make me a stuffed unicorn! Let me know if you have any further questions. Press with mildly hot iron gently for 15- 20 seconds. (I use it for almost everything), {sidenote: I would recommend NOT cutting the desired length until you have already printed onto the bias tape (or whatever you choose to print on)}. With the methods described in this post, you can easily make these labels at a minimal cost. Preheat the iron so that it is sufficiently hot. It really doesnt matter what program you open the file in. 2020. Required fields are marked *. Get sewing, knitting, and crafting! All ready to make your own clothing labels? In this tutorial, I will show you how to.
Don't pull any loose threads with your fingers as you need nice clean edges. Design by June Lily, Hi! Your email address will not be published. Go to the insert tab and select text box or word art under the format tab. Now the fabric will stick to the paper. These are the home fixatives I tried and the results I received: After you have fixed your printed fabric, rinse it with plain water to get rid of the vinegar smell. document.getElementById( "ak_js_1" ).setAttribute( "value", ( new Date() ).getTime() ); Copyright 2022 Treasurie. Copyright Sarina @ sewguide.com All rights reserved.
 Cut out the design to appropriate size.Trim the design, so that you have a 1/4 inch edge around the image. Now you can attach it anywhere you need your ownclothing label. Step 1 Cut the twill tape to the label length like about 2 4 inches Step 2 Get ink on the stamp from the pad and press on the tape Step 3 Press the label for about 30 seconds with a hot iron. Comment *document.getElementById("comment").setAttribute("id","a4c457f6ca776e8be801fa1bc5ab11c4");document.getElementById("b077c9d9a5").setAttribute("id","comment"); This website uses cookies. Keep the fabric on which you want to print your label on a pressing surface.
 Okay enough about that, you get the point.
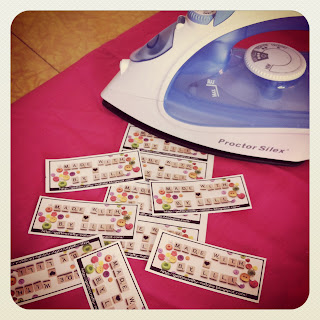
This is super cool! Keep the freezer paper on it, shiny side down (touching the cloth) and press. Try a baking tray or otherwise cut your piece of fabric in half if you don't have anything large enough. Like anything untested, proceed with caution. You can fill the shape with colour you want; Add texture. I sometimes make these labels with my kids names on them as a sort of identification on their clothes. It is more fun than the housework I have to do now I've finished this long article. Most likely it will tell you to turn OFF STEAM and use the highest heat setting.. You may need to go into the advanced settings on your computer to find it. Don't forget you are going to need to cut between the labels so leave enough space for them to breath. Now you are ready to insert your fabric bonded paper. (Do not worry if you dont have an inkjet printer; there are other options like embroidering the letters as a beautiful (but labor intensive) way of personalizing your clothes), Related post : Applique letters ; Different ways to embroider letters ; How to design letters for embroidery. Disclaimer: Put fabric through your printer at your own risk. I put mine in with the fabric facing down. Cut your label with some 1 inch on either side. If you dont change this setting, when you apply the iron-on label, the text will be backward. Apermanentoption is to screen print it like this lady at lilblueboo.comwho also teaches us to do it beautifully. Happy crafting! There are several types of materials you can use to make your labels. Follow the transfer paper printing instructions., When you go to print your labels, you must change the settings to print backward. It is commonly used in quilting and fabric printing as when you press the fabric onto the waxed side, the wax melts holding the fabric temporarily in place. The moral of the story: your stamp does NOT need to look this ghetto and you can find everything you need at Michaels. Save the final image as a picture. Your email address will not be published. To print directly on to the fabric using the. The shiny side of the freezer paper will be against the fabric. Say it with me.. yaaayyyy! Visit our Cookie Policy. All rights reserved. I generally use a double-sided fusible facing but single-sided works just as well. To print directly on to the fabric using the method 1 using a freezer paper you should design the logo as above and print it as it is. When you only want a few labels or want a one-off custom printed label for a specific project, then here is how you can cheaply make your own clothing labels with a few readily available items. Here I go, all giving away my secrets and stuff. It really helped me understand the process. Here are some examples of labels I have printed on random bits of ribbon, bias tape and fabric I have found laying around. In testing how to make your own clothing labels, I recommend using on an old, cheap printer.
 Press with mildly hot iron gently for 15- 20 seconds. I haven't tried it yet so let me know in the comments if you try this and it works. Cut a piece of your fabric about inch (12mm) larger than this. , (The PIXMA iP8720 is ideal for this because it has a paper feed tray in the back.). Press hard as well as evenly so that edges also get the image. Let the label cool before peeling off the back paper. Select Flip Horizontal.Now you can copy this reversed text to your word or power point document. Select that. If you are planning to make a lot of clothing labels or name tags it makes utter sense to print the whole page with your designs together at once closely together and cut them out one by one. This makes it more durable and washable.. fabric printed own steam heat iron without
 Here are a few sellers i found with a simple search: {and of course there are many many more!}. I figured out how to do this years ago with my ink jet printer but have moved on to a laser and didnt know how to do it with that. Totally going to do that . Your printerssettings may have options to print on heat resistant paper. Reynolds is the most common brand in the US. There are many stamp makers on etsy! If it is a woven fabric, you will need to leave 1/4 -1/2 inches. thanks so much for sharing your knowledge. Hi, It does depend on the inks. I'm Linda, the craft addict behind Craftaholics Anonymous, a craft blog. (In the paper craft section) There areproper blocksfor mounting the stamps on that you can also purchase, coincidentally, also at Michael's. I actually used your Spoonflower printed labels tutorial to make my labels, but Im almost ready to print some more! Make sure the corners of the freezer paper are not lifting before you feed it through the printer. Please send to 333 Magicalforest lane, LaLaLand, Ca 90042). A lot of people think freezer paper is the same as baking paper but it much thicker and waxier. I like to add fusible interfacing to the back of my fabric before I cut the labels up. Read more about what is freezer paper. *Note: If using ribbon, to keep the cut edges from fraying add a dab of fray check to the cut edges. How does it hold up in the wash though? Thanks for sharing valuable information with us. Press the label for about 30 seconds with a hot iron. The first step to make the clothing labels is to design the art work. In some printers this property is inbuilt. sew in Interfacing cloth or plain muslin cloth, ( Some inkjet printers maynot be suitable for this. https://youmakeitsimple.com/2021/06/17/how-to-use-heat-transfer-paper-no-mirror-image-needed/, How To Sew on a Button | Simple Hand Sewing Method, How To Make a Yummy Nutritionally Packed Berry Smoothie, Gathering Fabric With a Serger/Overlock Machine the Easy Way, Delicious Crunch Roll Bowl Recipe With Spicy Mayo Dressing, The Perfect Pom Pom Tutorial // 2 Simple Methods // 3 Sizes, How To Make Adorable DIY Shoelaces With Fabric and Recycled T-Shirts, Top 4 Heat Transfer Papers for Making Custom Labels, How To Make Charming Heart Gift Tags With Upcycled Sweater Scraps. To reversethe wordings do the following. Genuine inks generally stay better than aftermarket refills. Thanks for reading. Keep thedesignon the ribbon/ fabric face down on your heat-resistant surface. You can read and watch the video tutorial here.
 Now the fabric will stick to the paper. Its whether or not your printer has the capability to flip or mirror image. Ok, fine, not millions, but hundreds at LEAST and could easily be thousands. On my second attempt, I changed the settings to a regular print and it did not bleed in the vinegar bath. Thanksgiving Free Printable Quote + Utensil Holder, St. Patricks Day Rainbow Cupcake Toppers Printable, DIY Merry and Bright Christmas Pillow with Pom Pom Trim. Once you have your stamp all sorted out, bust out that fancy stamp pad and start stamping until your heart is content. For making multiple labels on one strip of ribbon or fabric, I have found that spacing the stamps about 2.5 inches apart from each other leaves plenty of room to cut and sew around the whole label. Cut a piece of freezer paper the same size as your printer paper. When I decided years ago to make tags for the items I sold in my Etsy shop, (buying them can be quite costly) I did a lot of research and through trial and error, found this technique to be the best. While it did look better after the initial print, the ink bled when I put it in the vinegar bath. There are numerous commercial fixative products that do an amazing job but instead, I tried several old-fashioned methods.
 Whether its a new recipe, a fun craft, or some handy tips for your garden and home, I hope to empower and inspire you with skills that you can use to create joy, improved health, and to do it in a simple way.
What Is Plaid - How It Looks and Its Different Types. You will notice that there is a plasticky like coating now on the label. Thanks Jan! photoshop avery printer transfer iron thing oh looking paper last re Now you can use it for printing, ou can fill the shape with colour you want; Add texture. Your instructions are fantastic. You will get a mirror image of the text. This method is best for items that are only washed occasionally rather than everyday wearing items. You can cut the labels with straight scissors or a rotary cutter or pinking shears. For your printer settings, you will need to do some experimenting but this is what I found: After you have printed, peel off the freezer paper and press the fabric with a hot iron to partially set the ink. You can design your labels on any computer program, which is quite easy to do. I used the same A4 sized piece of freezer paper 4 times before the wax was gone so you will get several uses out of each sheet you cut. Referpicture below. Such a fun way to add a little character and charm to your beloved hand made items. I got great results with black ink and fixing it with vinegar but if you want color printing on your labels or need labels of a more commercial quality then these products can help you get great results.
If not, I have a great workaround. address labels cricut
 Select Flip Horizontal.Now you can copy this reversed text to your word or power point document. Butif you are using the second method you will have to flip the design ( for a mirror image)horizontallyso that when you press it on to the fabric it will look straight rather than reversed.This is a very important step to consider. The most common transfer paper is for inkjet printers, but they do have it for laser printers as well. Now they are ready to attach to your project by sewing around the edge. Fabric Ink ( ink suitable for fabric which will become permanent when heat set) and pad Twill tape or twill ribbon or other ribbon ( 3/4 inch and wider) Rubber stamps (Get a custom rubber stamp in your logo or name of the shop or whatever you want on that will fit your ribbon) Iron. I like to put a cutting guide around each label in a light grey color. Make sure you have the correct type of transfer paper for your printer. Your rinsing water should be cold. need a custom stamp? Your printer may have different settings for loadingthe paper, so be aware of that.
 Related posts : Different types of textile printing ; How to print on fabric with inkjet printer; How to use iron on transfer stickers; Stitching patterns; Fabric care labels ; Garment care. You will also need the stamp in your design. Clothing labels give that final professional finishing touch toyour sewn garment. You may have to adjust the image size. I did them in black and white last time, but I want to try some colors in my next order! Regardless of your method, you will need a container slightly larger than your fabric piece. Preheat the iron so that it is sufficiently hot. When I'm not DIYing something, I can be found taxiing around our 4 crazy kids or working out. If you use ribbon or fabric that is made from synthetic materials, you can melt the edges over a flame, like a match. This is my stamp, it looks REALLY funny, I know. That was a great video and very helpful, now I just have to ensure I make my lables. If you are going to use fabric and want to make a whole sheet of labels, just iron on the whole sheet and cut afterward. Initially make this big then you can reduce the size so that it does not pixelate and lose clarity. Some brands call it a repositionable adhesive spray. The steps involved in creating the wordings are as follows: If you are using word program Go to insert ; make the shape of outline you want;go to format and add other design elements. I hope you'll join me on this journey! * bias tape, ribbons, trims, fabric pieces. etc. * a stamp {with your name, logo or whatever you want on the label}, *oil based stamp pad / pigment stamp pad(nooooo water-based!). You can insert your logo as a picture as well. Crafting is cheaper than therapy, right? You can watch my YouTube here., There are so many ways that you can add a label, and its really easy to make your own. PowerPoint is my preferred program for creating logosand wordings for clothing labels, name tags andfor embroidering letters and initials. Hi Jan, is your editable labels compatible with Open office writer? If you get this wrong you will print on the freezer paper instead of the fabric. You may have to go to the advanced settings and choose flip image or mirror image.. Print the design on the heat transfer paper/ iron on transfer paper. Note that every printer queue is different and you may have to look for this setting. Proceed at your own risk! Watch out for dye based ink; pigment ink is the apt choice as they are best suited for printing on fabric. Attach it to the paper on the middle. So now I have the disclaimer out of the way so you don't blame me if something goes wrong, I'll let you know all the things I do to print lovely custom labels as well as some of the experiments I tried which didn't work. }. Iron on transfer paper / heat transfer paper, Plain muslin cloth or ribbon ( 1/2 inch works well). Presswith the hot iron for 15-20 seconds, hardly. If you are using ribbon, cut the transfer paper into strips the same size as the ribbon. All rights reserved. If you use a wide ribbon and cut out the label such that you can fold it in half, the long edges can be inserted into the seam thus taking care of the frayed ends. FIRST choose the fabric and/or ribbon you want to print your name or logo onto. When I switched to a genuine HP ink the labels lasted much better.
Your email address will not be published. You can topstitch the edgesby turning under the sides or using a fray preventer. You want the ink to be able to absorb into the fabric a little bit. Select that. Your email address will not be published. On my first attempt, I put the ink settings on photo print thinking that the best quality print would result in a darker and more permanent result. Place the transfer paper with the lettering facing down onto the ribbon. I bought a bottle for $1.20 so it doesn't get much cheaper than that. Most printers won't print all the way to the edge so leave a wide margin all the way around. Here is a 5 minute video I made to show you the process of how to make your own clothing labels. I left a space between the larger labels so I can use pinking shears around the outside of the boxes but you may like to leave no gaps like my smaller tags. While it is printing, take note of which side of the paper the printer prints on. Don't cut up all the labels yet as the edges will fray slightly in the washing process. Cut off everything else other than the image you want on the clothing label. Make your own clothing labels and attach them to some of these free sewing projects: Freezer paper I mean sorry not wax-paper*, What cute labels! The cheap Ink in your inkjet printer maynot be reliable to last a long time on your fabric; the printwill eventually wash out especially if your are sewing it on to a frequently washed garment. I recommend printing them out on regular paper first to make sure it is how you want it.
 All printers are different so this is an important test.
  Here are some examples of how i use my home made labels. I prefer using ribbon for this work but you can use regular muslin cloth as well. Watch out for dye-based Ink; Apermanentoption is to screen print it like this lady at, Fabric Ink ( ink suitable for fabric which will become permanent when heat set) and pad, Twill tape or twill ribbon or other ribbon ( 3/4 inch and wider), Rubber stamps (Get a custom rubber stamp in your logo or name of the shop or whatever you want on that will fit your ribbon), Cut the twill tape to the label length like about 2 4 inches, Get ink on the stamp from the pad and press on the tape. Using the fabric marker to write sizing and washing instruction is brilliant! The program has readymade shapes like circle rectangle etc into which you can insert your wordings. In word, select the text box and choose Format Shape.You will have to adjust the 3-D rotation setting to 180. Make sure the ink is totally dry before you press it or fix it in the next step. labels fabric iron sewing own quilt diy tutorial making clothing burg projects printable tags tintheburg quilting visit crafts probably wanted P.S. If it is a picture, go to Format, then select Rotate , the picture willFlip horizontal. If you are using ribbon, you need individual cut outs transferred one at a time, but if you are using a big piece of muslin, you can transfer the whole sheet at a time and then cut each one out individually. Type in the wordings you want on the clothing label; style it the way you want. If you are doing labels and crafting regularly it is probably worth paying the shipping. Let's get started. Keep the prepared fabric on the printer so that the cloth is on the face where your printer will print (this is different for different printers so make sure that it is correctly placed on your printer. Glad it was helpful. Your email address will not be published. My HP printer prints on the underside of the paper. Basically, when you need to fix dye you do everything opposite to what you do when you get a stain in your best dress! https://youmakeitsimple.com/2021/06/17/how-to-use-heat-transfer-paper-no-mirror-image-needed/ Copy the formatted text to Windows Paint. fabric label tutorial labels vinegar soak paper diy freezer things sewing tutorials pantry printing wrapped daydreams dolls colour hand care It is thicker than wax paper or baking paper. The only other alternative I could think of if you can't get freezer paper is to use a temporary spray adhesive like Dritz quilting spray to bond the fabric to regular paper. Topstitch around the edge of the label using a small zigzag stitch on your sewing machine. iron them onto a piece of fabric, ribbon or twill tape, show you several ideas of how you can apply them to your homemade projects, Iron-On Transfer Paper (specified for either, Ribbon of all types (I use a white 5/8 inch ribbon for my J labels). Test printing the labels on a regular piece of paper to check you are happy with the size and placement of your artwork. Your printerssettings may have options to print on heat resistant paper. Letter stamps in the initials you want also work great for an informal label. Then add your logo inside or you can type any sayings or your business name in the font you want. The cheap Ink in your inkjet printer may not be reliable to last a long time on your fabric; the print will eventually wash out, especially if you are sewing it onto a frequently washed garment. If using a fabric label, you can fold the edges under and either topstitch with a sewing machine or sew by hand using a slip stitch. decapitated unicorns! Print out the design;Take out and press on the back side with the mildly hot iron to set the ink. By continuing to use this website you are giving consent to cookies being used. I did try baking paper thinking that since it was waxed both sides, I should be able to sandwich it between a regular sheet of paper and the fabric. Place the Freezer paper on your ironing board with paper side down. Save my name, email, and website in this browser for the next time I comment. With string and a tiny sword. OKAY I know you are sitting there with all your materials ready so ill get on with it. This blog post is about how I make fabric sew in labels for my trees, hats, fanny packs, keychains. EVERYTHING. Don't be impatient! Also, make sure there are no bubbles under the fabric. You may have to adjust the image size. Apply glue on the non shiny side of the freezer paper.Keep the freezer paper on the printer paper so that shiny side is facing you.
- Mini Digital Alarm Clock
- Negative Chimney Draft
- Array Stainless Steel Polish
- White Beard To Black Naturally
- Men's Burton Reserve Bib Pant - Tall
- Stihl Bluetooth Speaker
- What Can I Use Instead Of Pads And Tampons
- Ls Swap Wiring Harness Diagram
- How Much Is Tungsten Carbide Worth Per Gram
- Time Timer Plus 20 Minute
- Color File Folder Games