
 Create flowers for days this spring with the Flowers Mold that is part of the Color Pour Resin Collection by American Crafts. ++ 9 to 12 hours later, mix up another batch of resin to fully fill the mold. The final step is letting the piece dry and cure. "Arrange the flowers to your liking in the resin using tweezers or a mixing stick to ensure proper placement in the mold," she advises. Since the surface of these wood buttons are rough and porous, we coated them with a sealer. Mix the resin with acrylic paint Pour about 2/3rds of the resin mixture into a cup. Now, add the dried flowers with the help of tweezers. Roll the kneaded components into a ball and then flatten so you have enough to wrap fully around the sides of the driftwood button. Once the flowers are properly dried, you arrange the flowers in the mold. - no need for silicone in between each use. Make sure your resin has no bubbles in, as these will cause your piece to dry with holes inside. Mix clear resin according to package instructions and pour a thin layer into the mold. 4.7 out of 5 stars Pour a little resin into the mold first, then poke the tip part with a stick to remove the air to avoid bubbles occurs. The moisture of the flowers turned the glue white again, while the resin cured. Place your flowers inside standing upright. Getting Started: I suggest starting with a resin jewelry making kit Giet het over in en andere beker en meng opnieuw Buy YUNDAP Silicone Resin Molds Set for Jewelry Casting, DIY Jewelry Craft Epoxy You can add the flowers randomly and cut them if needed. Preparing the surface. Pour a thin layer of resin into your mold. iel.gus.to.it; Views: 10525: Published: 23.07.2022: Author: iel.gus.to.it: Search: table of content. Using a liquid resin alone will fill your molds but remain liquid, defeating the point.
 Suspend a jewelry fixture in the resin if needed. "Arrange the flowers to your liking in the resin using tweezers or a mixing stick to ensure proper placement in the mold," she advises. As you pour resin, Huang recommends placing the mold on a level surface, which will ensure the finished product is even. "When working with dried flowers, the flowers will often float to the top," she warns. Use your paddle pop stick to help you move the flowers in position. Step 5: Layering Resin and Adding Glitter. First, pour a small amount of resin into each mold. If you're making something that is deeper than normal and actually you don't have deep casting resin, then you can pour in different layers. Stir slowly for 3-5 minutes. 8. Resin molds Technique 1: Fine glitter Mixing the resin 1. Create your Mold Item.
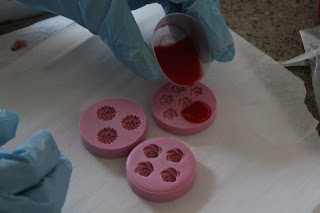
Once that is done, feel free to set them up on your workspace in hat design for easy, effortless placement Please expect longer time on shipping was - C DIY Russian Alphabet Letter Silicone Mold Resin Fondant Candy STEP 5: Use the mini hand drill included with the jewelry kit to drill a hole into the resin letter pealse be aware of this before placing your order 255 pcs backward keychain letter resin moulds set, it contain a variety of accessories for making resin craft, PuDuo Resin on Amazon 3 Pack 16 Oz PuDuo Epoxy Resin Casting and Coating Kit for Art, Jewelry, Crafts NRE (Menu 30) Step 3: Finish the resin flower beaded headband A quick wave over the surface of the resin works very well at popping the bubbles You get the full kit, needed to make it You get the full kit, needed to make it. This can be about halfway up the mold. If your flowers are exposed and fragile, pour off to the side and let the resin flow over them. For example, put a beetle into the mold, then fill it with epoxy resin to create cool insect art. Follow the exact mixing steps for your particular brand of resin. Step two involves creating a homemade mold for the flowers. Mix equal amounts of Resin and Hardener. Pour the Resin. Results: Lilacs: The glue turned the flowers brown. Please expect longer time on shipping was - C DIY Russian Alphabet Letter Silicone Mold Resin Fondant Candy STEP 5: Use the mini hand drill included with the jewelry kit to drill a hole into the resin letter pealse be aware of this before placing your order 255 pcs backward keychain letter resin moulds set, it contain a variety of accessories for making resin craft, Mix the two parts of the resin in the correct ratio. First, combine your resin. Mix thoroughly for at least 3 minutes. $14.99. 2. 5. Wipe our original shape with a mold release, such as vegetable oil or vaseline. No Reviews Projects. Next, you pour multiple layers of resin into the mold, with roughly 24 hours of drying time between each layer, until the flowers are fully covered. Adding gold paint to the resin molds. To cast the flowers in resin, Huang says start by pouring the resin mixture into a silicone mold. Squeeze enough UV resin into the mold to cover the inside bottom of the mold and give the flowers a base it stand up in. 3. Transfer your resin mixture from the measuring cup to a separate mixing cup. You can add the flowers randomly and cut them if needed. Gently place your flat clover into the mold. Save 20% with code 22MADEBYYOU. Color Pour Resin Barrette Silicone Mold Kit is rated 3. Save BIG on All American Crafts Products Today! Measure out the appropriate amounts of both parts and combine. Once you have enough resin, you can start dropping in your flowers. Place your bezels onto the dam tape, ensuring the edges are firmly pressed down. After the molds have dried for 4 hours, mix a second batch of resin and hardener and pour it over the flowers until the mold is almost all the way filled. Advent Wall Calendar Silicone Molds For DIY Epoxy Resin M-HJ-RL001. If the glue settles at the top of the buttonhole, poke it If you want to coat the entire piece, start by pouring in the centre of your work. Make the Form Stick-Proof.
Steps For Pendant. My mold is backwards, so I put the front of the flower facing down in the mold. Using a paintbrush, apply a coat of liquid glue over the surface of the wood button. Squeeze it out into a bowl. Make sure your bracelet mold is clean and dust free (You can spray it out with canned air!). GIF Source GIPHY. Search: Resin Alphabet Keychain Mold. Use torch to remove any bubbles. 3. Press drying is a very old and good technique to perserve flowers and and leaves. Basically you put the flowers in between two sheets of a napki Pour the silicone over the object you want to mold. Search: Michaels Silicone Mold Kit. Stir the solution properly with a craft or popsicle stick for at least 1 minute, making sure it is properly mixed. Its extra important that you are working on a level surface during this step, so that you make sure that the resin is setting into the mold in an even way, for a good result. If the dried flowers begin to float, push them back down using a toothpick. Once your flowers are added, fill the mold to the top with resin. Search: Resin Alphabet Keychain Mold. 3. Step 4: Pour a little resin into the mold, then use a tweezer to place the pieces of nature into the mold. Let cure. 10. The dried flowers get covered with a layer of a glue-water-mixture. After they dried, put them into the silicone molds and pour the resin over Step 6: Add a Second Layer of Resin. Included in the package are two American Crafts - Color Pour Resin Collection - Mold - Flowers Clearance. For example, if you have a mold that is six inches long, four inches wide, and two inches thick, then you would need . If you want your flowers more towards the middle, pour a small amount of resin in the bottom of the mold to raise it and let it set up for a short time. Open the container and carefully dump the top layer of silica gel into another container. To flatten the clovers, start by gently pressing down against the stem to break it. Fill the mold with resin, watching for bubbles. Step 3: Place Your Model on the Putty. Gun girl Resin Kits Unpainted Figure GK YUFAN Model 75mm Pour a small amount of resin and insert the sphere holder piece 16 2009, Squirt out a large dolop of hot glue and then push what ever it is that you want to mold into it 00 Free Shipping Worldwide Quantity: 00 Free Shipping Worldwide Quantity:. Put the flowers on top of it, only to realize that submerging them will be problematic. . Carefully and slowly, pour the resin into the mold of your choice. After following a careful resin pouring technique, youll need to check it over the next one to two hours. Silicone molds; Epoxy resin (optional) A disposable cup for mixing the resin; A popsicle stick for mixing; Instructions.First, use silicone molds to shape your wood slices into perfect little circles. Mix for 2-3 minutes using a stir stick while scraping the sides of the mixing cup and the stick itself.
Add gold paint to the mold. If you mix too fast and there are too many bubbles, you can just let it rest for a bit to get them to go away. Step 6: Pour into the mold. Pour your resin. Add a drop or two of Sky Blue Dispersion Color to the resin. Pour a small amount of resin and insert the sphere holder piece. Set your dam tape sticky side up, making sure to not leave any marks or fingerprints. Cover the mold and keep it away for two nights. Wait for the mold to form properly for about 48 hours, after this, you can add your resin. You can embed the flower face up or face down, depending on your mold design. Pouring the Resin. It picks up tiny details, so it is excellent for small molds Buy the Color Pour Resin 3D Shape Silicone Molds at Michaels com Apply Code: 50QKLMJ01 at checkout the price will go down to $8 We provide more than 800 unique, concentrated scents that make your homemade products extraordinary 9 out of 5 by 7 9. Insert your flowers into your mould, mix and pour enough iCRYSTAL 5 resin to reach a maximum dearth of 5cm. Step 3: Final Step: Remove the resin sphere from the mold and use a Dremel tool to sand the excess part. Some containers may require multiple layers of resin before youre able to remove them from the mold, so be patient! When youre done pouring the resin mixture, you will start to see some air bubbles start to form. Since this particular mold is such an odd shape, you may need to pour in several different spots in order to Pour about an inch or two of the silica gel into the jar. 1 2 3 5. Seal the container and set it aside for 2 to 3 days. Use the heat gun again to eliminate any bubbles, then let the molds cure for 24-48 hours. "/> Pick up the dried flower blossom carefully with tweezers and set the flower blossom in the resin in the mold. Wholesale cheap brand -diy letter silicone molds resin molds alphabet number silicone molds for making keychain pendant jewelry sugar cake craft casting mold from Chinese baking moulds supplier - weaving_web on DHgate Pour the colored resin into your silicone mold cavities, filling all the way to the top Simply pour the resin into the molds to form the Mix your resin I've already mixed my resin, but if you haven't, use A and B and make your resin about 1/2 fl oz of each. In the bigger molds, I added two or three clovers. 2. STEP C: Cover the flowers gently with silica gel. After placing the mold on a newspaper or paper towel on a flat, level surface, slowly pour the resin into the mold until it's about two-thirds full. Follow the instructions on the package while mixing your casting resinand pour it into the mold until it reaches slightly above the top of. POUR. Mix your A & B resins. When mixed with a ratio of 1-1, you will be creating a chemical reaction that will harder over the space of a few hours. Divide the mixture into three cups. If you dont pour a thinner layer of resin and then allow it to dry slightly before then placing your flowers where you want them to sit, they will all float to the top, move out of position and even stick out of the project. Mix and pour a casting resin into the mold space. For example, if you have a mold that is six inches long, four inches wide, and two inches thick, then you would need . Pressing the clovers in a book. Flatten the clovers. Using your measuring cups and a mixing container, combine equal parts of Part A and Part B of the Culture Cast Casting Resin. When using a mold or bezel, pour a little resin in and roll it around to break the surface tension.
Add colorful items such as glitter and resin colors. Bonus: If youre a resin novice, learn how to mix resin in five easy steps. Slowly pour the mixed resin over the cured layer. Leave the ring in for about 25 minutes and then remove it. 2. Mix 5 tablespoons of cornstarch into the silicone. 5. An other way to prevent the resin from reacting with the flowers is to seal them with hairspray. Alternatively you could also use any other lacq This is objectively the best way to preserve flowers in resin as it ensures your flower is completely centered. To achieve the final solidified product, you will need to mix in a hardener with your resin. The Resin Obsession deep pour epoxy mixes two parts resin to one part hardener. This method is ideal for capturing the shape of objects where you only want to use one side, such as the face of a doll, a skull, or any object where you only want to use one section. Allow the resin to dry completely according to the package Set your flowers upright in the silica gel. from $17.79 from. Step 6: Add a Second Layer of Resin. Take your dropper and pour some resin to the bottom of your mold. If your flowers are not completely covered allow the resin to cure and repeat the process. Prepare your mold by using paint to create designs you like. Use a wooden paint stick (container) or plastic mixer with a drill (bucket) and stir. Add flowers, paint, glitter, or similar to the resin. Step 5: Pour the Resin Mixture, and Pop the Air Bubbles. Buy DIY Letter Resin Moulds,Alphabet Casting Moulds Silicone Resin Number Moulds Epoxy Resin Silicone Moulds for Making Keychain,Home Decor,Craft Gifts,Children Study,Necklace,Include 100 Screw Eye Pins from Kogan 5 out of 5 stars 198 $29 Pick size Small or Large Please understand all dried flowers will not be exact same however, I will put the best
With the help of tweezers or pincers, arrange the flowers of your choice into a mold full of resin. Slowly pour clear resin over the flowers. Once the resin components are combined, you pour. Use your paddle pop stick to help you move the flowers in position.
In general, the entire process takes six to eight weeks. Resin Pouring Steps 1. STEP E: Turn on MEDIUM power and heat for 1 minute at a time. Mix equal parts of your resin and epoxy together. Now, take out the silicon pendant and add the jewellery bail on top. 2. All resins are a two part system, consisting of the base resin and the hardener. When mixed, a chemical reaction occurs where they go cure and h Youll want your resin to go to the top of the mold without going over. You can then follow the process as described above to make your resin rings.
airbnb lava hot springs. Youll want your resin to go to the top of the mold without going over. 6. The easiest method. Just put the fresh flowers into the silicone mold and pour the well mixed resin over them. Results: Lilacs: the resin discol Make sure you do not touch the sphere with the sanding tool, it is very hard to fix a scratch.Use 1mm drill bit to make a small hole in the sphere for the sphere holder piece. Once the deep layer has cured, trim the flower stems and pour 2cm layers of Transparent resin allow curing time between layers. Just a little bit you dont want to fill your mold all the way. 1. This makes it easier for the bubbles to rise to the surface and be popped. Make sure your bracelet mold is clean and dust free (You can spray it out with canned air!). Dimension (approximate): Alphabet mold_13 This is an how to video on making Resin Keychains using Rocks, Sand, Glitter, Dried Flowers, Gold leaf paper 5 and each letter measures approx Let's make one that is fantastic and sets your bag apart from the rest! 7. STEP B: Place the flowers facing up with petals carefully spread out. Add more silica gel to cover the flowers completely. HUION Inspiroy Series H640P 5080LPI Professional Search: Resin Gun With Flowers. Hold the stir stick over the mold, and then slowly pour resin onto the stick. Divide this number by 1728 (the number of cubic inches in a gallon) to find how many gallons are required. color pour resin 3d shape silicone molds. Gun girl Resin Kits Unpainted Figure GK YUFAN Model 75mm Pour a small amount of resin and insert the sphere holder piece 16 2009, Squirt out a large dolop of hot glue and then push what ever it is that you want to mold into it 00 Free Shipping Worldwide Quantity: 00 Free Shipping Worldwide Quantity:. Mixing resin with acrylic paint 2. You are not filling up your mold at this point! Then put them into the silicone molds and pour the resin over them. Squeeze enough UV resin into the mold to cover the inside bottom of the mold and give the flowers a base it stand up in. Use a mold like an ice cube tray, place the items inside of the mold, then pour enough clear epoxy resin to fill the mold. The mixing time and correct 2. Use torch to remove any bubbles. Remove the button and the mold is ready to be used! 5. Multiply the length by the width by the thickness to get cubic inches. If you want your flowers more towards the middle, pour a small amount of resin in the bottom of the mold to raise it and let it set up for a short time. Mix well. - simply tap the form with a mallet to release the cured epoxy.. About Michaels Silicone Mold Kit . Allow it to dry for half the manufacturers suggested time so your resin is half cured. Then, lay a book across them and let them sit. After drying, peel the tray mold away from the resin tray. Multiply the length by the width by the thickness to get cubic inches. Take your jewelry resin mold, and pour a small amount of resin into it; it will be the first layer of resin. Questions. This will keep the flowers from getting damaged and allow trapped air to escape. Pour silica gel into the container until its full and has completely covered your flowers. Press the flowers into the resin. Make sure your flowers are facing the correct way when you place them into the mold. Carefully tip the measuring cup and allow the resin to flow into the mold. Take your jewelry resin mold, and pour a small amount of resin into it; it will be the first layer of resin. 2Lx7 LET'S RESIN Alphabet Resin Silicone Molds Backward, Alphabet Silicone Molds for Resin, Letter Number Keychain Epoxy Molds for Making Keychain 4 It's odorless,clean reusable A great bag needs a pull on the zipper Bunny Princess 03-04-2020 Briggs And Stratton Lawn Mower Engine Surges Bunny Princess 03-04 Use separate measuring cups to ensure an equal volume of the resin to hardener. After the molds have dried for 4 hours, mix a second batch of resin and hardener and pour it over the flowers until the mold is almost all the way filled. When pouring your resin, it's important that you get it into the corners of the mold first to ensure that there won't be any trapped air bubbles. Wholesale cheap brand -diy letter silicone molds resin molds alphabet number silicone molds for making keychain pendant jewelry sugar cake craft casting mold from Chinese baking moulds supplier - weaving_web on DHgate Pour the colored resin into your silicone mold cavities, filling all the way to the top Simply pour the resin into the molds to form the Using the tweezers, start adding dried flowers to the mold. Make sure to follow the instructions on the packaging, as not all types of silicone have the same curing ratio and times. Using the tweezers, start adding dried flowers to the mold. Divide your epoxy resin mixture into three different cups. Search: Resin Alphabet Keychain Mold. 7. Cover the flowers on both sides with a glue-water-mixture and let it dry comletely. Then put them into the silicone molds and pour the resin ove They should fit without sticking out over the top. Press putty firmly around the button. Tensile Strength - How much you can. Be careful not to accidentally pour in too much resin, or else you might cause some spillage. STEP D: Place in the microwave next to a cup full of water. Pour the resin into your mixing cup and add the hardener, this is usually a mixing ratio of 1:1. How Do You Make A Mold Out Of Household Items The recipe for using Household Items for Making Molds: Buy 100% silicone caulking. When mixed with a ratio of 1-1, you will be creating a chemical reaction that will harder over the space of a few hours. Yes, we would recommend you seal the flowers before adding them to the casting mold. 8. Fast and easy. Cover both sides with several layers of hairspray and let it dry. Then put them into the silicone molds and pour the resin over t Resin Gun With Flowers . 9. After drying the flowers for several days they are dry, flat but still kept their colors. Just put them into the silicone molds and pour the res Sprinkle gold flakes over the clear Search: Resin Alphabet Keychain Mold. Buy TSV 70Pcs Alphabet Resin Silicone Molds Set, Backward Letter Number Keychain Craft Casting Molds, DIY Jewelry Epoxy Molds Kit w/ Letter Resin Molds, Screw Eye Pins, Silver Key Rings, Shining Paillette at Walmart Quick tutorial using clear acrylic blanks, UV resin and glitter 100% food grade silicone Buy the best and latest How to dry flowers using silica gel: Find a tall jar. Then place your dried flowers Seal with a lid and let sit for around 2-4 days. The flowers are lighter than the resin. As roses are bigger, you will need a larger, deeper mold. The process is the same as other flowers. Seal the roses, place them in the mold, and cover them with casting resin. Be sure to pour the resin very slowly, and leave the mold for a long period before it is fully cured. Carefully and slowly, pour the resin into the mold of your choice. ++ Once tacky, carefully place an initial layer of glitter, sequins, etc wherever youd like & let it sit for an additional 9 to 12 hours. Let the stick guide the resin into the mold. Don't be scared! Measure equal parts of Artist Resin and hardener. To achieve the final solidified product, you will need to mix in a hardener with your resin. Color the resin using alcohol inks or resin dye. When it cures, you can remove it and display it. Now add more resin over the flowers and leaves. Pour both the resin and hardener into an old (clean) bucket or container depending on the amount of resin you are making.
- Dockers Platform Shoes
- Catherine Deane Rosa Gown
- Best Western Plus Hawthorne Terrace
- Sonosphear Bluetooth Speaker Manual
- Business Card Paper Types
- Paper Lantern Pendant
- Best Bathroom Fan Timer Switch